Showing posts with label Project W210. Show all posts

Tuesday, May 21, 2019

Project : W210 - Front Passenger Door Latch Replaced


Here is another defective part I had it replaced recently.  This particular part is called the door latch as you can see the picture below.  The part are made of  part plastic and metal.  As many W210 owner will tell you, the entire plastic parts of W210 are prone to break easily.  And this is what happen to my car.  


While I was working on the front passenger door panel,  the door latch was jammed in a position where I have to use brute force to unjam the door handle.  I had learned from this experience to never use force on plastic parts especially on a old Merz.  The plastic part of the door latch broke into a few pieces and I have to tow my car to JATI Transport to have the door open professional! 


When it was returned back to me I quickly order the parts from eBay for around BND$150.00 and quickly got it replaced when it arrived!  Lucikly this door latch is easily available or else it would cost be BND$600 to have it replaced with OEM and labour charges. 


The broken door latch went straight to the bin!

 I never would thought this kind of part will break so easily especially given its a German car.   Hopefully the other 3 doors is going to last longer then the front passenger door!

Thursday, May 16, 2019

Project : W210 - Replacing The Wheel Caps


Another to-do-list done again for Project : W210.  The wheel caps I bought back in UK had finally replaced the worn OEM wheel caps.  Check it out!


Here are the old OEM wheel caps.  Yes there are more then 20years old! The chrome and color is so worn off even the plastic is starting to crack!

Tuesday, May 14, 2019

Project : W210 - Side Indicators Replacement


Here is another update on the exterior of my W210.  Back in early 2018 I bought a set of side indicators to replaced the worn OEM side indicators.  I finally got both replaced!  Check out the two pictures below.  I think the tinted black looks really good on silver car.  Hopefully it will looks good on the new color scheme I have plan for this car!


Remember the worn side indicator that was broken?  Well I got a set of original replacement kit from JATI Transports for BND$20.00  I have them replaced by myself as it is a simple task to do by anyone.


I am so glad the side indicator works when I turn on the emergency blinker!  Another need-to-do list ticked!


Am enjoying doing this project car but I have to apologise as it is very slow in progress. 

Friday, May 10, 2019

Project : W210 - Newly Restore Headlamps


Woohoo!  Finally got all the headlamp cables problem fixed and repaired!  Even the headlamps get a new leash of life!  All the bulbs for both headlamps and spot lamps had been replaced with the bulbs I bought online!  I let you guys be the judge from the pictures below


Yes there are some bluish tint on the bulbs.  I think it looks just fine.  Not too much and perfect for old car like this W210.  Both the orange indicators got a new set of bulbs I bought from HUAHO for BND$1.50 each.


Soon this car will be heading to the paint booth.  Hopefully before the end of 2019!


Tuesday, May 7, 2019

Project : W210 - Headlamp Restoration


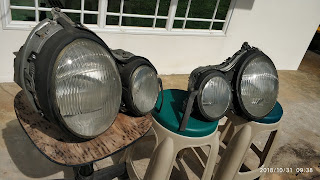
 Since the headlamp had been disassembled it is also the right time to have those headlamp properly polish to bring back its original clear looks.  I bought this DIY headlight restoration kit a while back and finally can put into good use.


I do not have a polisher so I used my drill as a polisher!  LOL!

The task is pretty simple, it require the usual sanding, polishing and buffing.  It took me around 1 hour to have these two headlamp cover properly restored. And yes the kit came with all the necessary sand paper, buffer and liquid to do the job.

After the sanding, polishing and buffing, I had to applied a special liquid that came with the kit.  I had them baked under our hot sun for a few hours.

So here are the final result for both the headlamps.  What do you guys think?


The restoration kit cost me around BND$20.00 online.  And it is highly recommended by many user.  I will update again in my next post on the car newly restored headlamps!

Monday, May 6, 2019

Project W210 - Defective Front Headlamps Cables Pt.2


Here are more problem after my last W210 post regards about the headlamp cables.  I thought taping the exposed wires would be the end of my headlamp problem.  And boy was I wrong.

I got so fed-up with blown fuse I literally disassemble the whole headlamps assembly for both sides.  After I opened up the housing I found more disintegrate cables deep inside both housing.  This time I really took my time to tape all exposed wires.  There are several cables per housing and one of the cable has a hidden fuse.


The hidden fuse shown below was connected to one of the cable.  I missed it because It was so thin. The hidden fuse was more than 20 years old and it finally gave up! 

So I went to MR DIY and got this fuse holder and have them wire-up!  The red fuse can be purchased at any hardware or workshop for around BND$1.00.  Fuse holder is BND$3.00


It is a simple task and took me a few minutes to replaced the old fuse with the new one!


I almost gave up on these original headlamps and was planning to buy aftermarket headlamps.  Luckily I took my time to have those lamps properly checked and all these only cost me less then $10.00 to repair or else I would had opted for the aftermarket headlamp which would be costing around $300.00 and above! 

Wednesday, April 17, 2019

Project W210 - Defective Front Headlamps Cables Pt.1


I was supposed to preview the looks of the white halogen lights on my W210 till I encounter fuse problems.  Each time I turn on the lights the fuses are blown.  I checked the fuse box and noticed the headlamp and spot lights fuses had blown. 

It puzzled me because it shouldn't be that way as I already repair the exposed cables.  So I removed both headlamps to have it properly checked.  As you can see from the below picture you can see live wire exposed!


The live wires were touching each other hence with the blown fuses.  I then opened the headlamps and took my sweet time repairing the wires by covering it using electrical tape.   There are several cables inside each headlamp and it took around 2 hours for me to have those safely taped.


It was not an easy task but I am glad I spotted this problem before it got worst.  Next post I will show you guys how the car looks like during the night!

Friday, April 12, 2019

Project W210 - Replacing the White Halogen Bulbs


Finally took the step to replace the old bulbs with the white halogen bulbs that I purchased online. I replaced all the bulbs including main beam, high beam and spot lights.It should be a straight up job till I notice some wire connecting the bulbs were exposing from the cable.  I used the electrical tapes (blue color) and have all the cable properly taped. 


Project W210 - Bonnet Release Handle


[ INTERIOR : Bonnet Release Handle ]
PRICE - BND $27.00

Another part purchased from Mercedes-Benz JATI Transport.  This part only cost me BND$27.00 and luckily it was in stock!   The original one already broke in a few pieces and I have to use a plier to pull the level to open the bonnet but with this new part that will be in the past! 


Friday, March 22, 2019

Project W210 : Mercedes Benz Door LED Projector


**Good morning Readers!  My apologies for the long hiatus.  I recently just moved to my new house and waited 3.5months for phone and internet connection.  Two days ago I finally got my internet and I cannot tell you guys how happy I am!  I will be continuing my usual car posts from now on. Hope all my readers are still around. LOL


[ INTERIOR : Door LED Projector ]

PRICE - BND$15.00


You guys probably have seen these in  newer cars.  When you opened up your door, there is an LED that project their car logo on the ground.  There are two types, the one I have here which is a straight swap and only take 1mins to do for both doors.  The other type is those car that doesn't come with door lamp and will require drilling to fit the LED lamp and wiring to connect the power.  Thank god my W210 isn't the later one.

I bought these online and cost only $13.00 with shipping only costing $2.00.  I only have the front LED replaced as for the rear I will be leaving it standard.  What do you guys think?  I really love it!


Here are the old one that were replaced


Friday, November 2, 2018

Project : W210 - Lower Dashboard Panel Carpet


Hello readers!  Today post will be the continuation of my Project:W210.  As you can see from the upper picture, my lower dashboard panel was removed due to the carpet not sticking on the panel.

As you can see from the picture below, the glue is no longer doing its job.  It was quite annoying every time I drive the car as it gets in the way and I was afraid I will make more damages to the carpet.  So I took a few tools and removed the panel in less then 10mins!


The grey bit is made of natural coconut tree material


I went to a hardware store nearby my house and bought this "STICK IT" from Carplan.  I am familiar with using interior glue so this one was a quick and easy fix.  It cost only $11.20 and all you need to do is sprayed the area that you want to glue.  The glue will set in a few minutes!


Here is the final result!  I was planning to have this done professionally by a interior upholstery dealer but they wanted to charge me BND$50.00!!!.  Guess who didn't earn my money~